Inline Images and Accessibility
Why should my images be inline with my text?
In a document, images are considered to be presented in one of two ways. An image can be "inline" with the text or and image can be "floating", meaning that it is not aligned with the rest of the text in your document. For sighted users, this might not be a concern because you are able to view the image just fine. However, if a user is accessing the document with a screen reader and the document has a "floating" image, the user will not even be alerted to the existence of the image.
Because of this, it is very important that you ensure all of your images are "inline" so that they can be recognized by screen readers.
How do I make my images inline with my text?
If you are using a Microsoft product, such as Word, PowerPoint, or Excel:
1. Select the image you want to make "inline".
2. Select the "Layout Options" icon that appears next to the image you have selected. This icon is a shortcut used to edit the formatting of your image.

3. Select the "In Line with Text" option in the popup window.
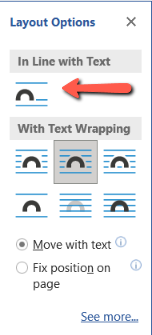
4. Your image is now inline with your text.
I don't like what inline images do to my document - how do I fix it?
Sometimes when you are editing your document and make your image "inline" with your text - your image moves! Luckily, this isn't hard to fix, and shouldn't deter you from making your document more accessible. Simply manually move your image back into the location you want it. Your image will look the same to sighted users, and be inline for users who are operating with a screen reader.
Still need help?
Let us know! We are happy to help make your content accessible.
Please contact accessibility@uada.edu